The Easy Guide to DIY Car Upholstery Restoration
Over time, car upholstery inevitably wears down from UV damage, dirt build-up, and daily wear and tear. But giving dingy, stained seats a facelift doesn‘t have to mean expensive professional reupholstering or replacement. With the right products and techniques, you can transform interior surfaces to a like-new condition yourself using budget-friendly upholstery paints and coatings.
This easy DIY guide covers everything from assessing upholstery damage to prepping, painting, and maintaining refreshed upholstery so it holds up for years to come. Arm yourself with the information, products, and process outlined here for professional-grade results without the professional price tag.
Upholstery Damage: Common Issues Over Time
Before determining the best restoration approach, it’s important to fully examine the current state of your upholstery. Some common problems that develop include:
Fading & Discoloration
UV radiation from the sun is the number one cause of upholstery fading and color loss. Fabric dyes break down over years of exposure leading to light or bleached spots. Plastic and vinyl components also discolor to an ugly yellowish hue.
Staining
Spilled drinks, dirt build-up in carpets, greasy residues from hair and body oils, and vehicle leaks or spills cause stubborn upholstery stains over time. These can be extremely difficult or even impossible to remove through cleaning alone.
Abrasions & Snags
Belts, buckles, zippers, and rivets on clothing abrade and snag fabric fibers every time you get in and out. PET fibers from fleece jackets are especially problematic. This accelerates visible wear like thinning or balding spots.
Breakdown & Sagging
Interior padding and stuffing materials degrade and compress after years of use. This causes loose, sagging seat cushions and flattened areas without support. Headliners also drop closer to passengers’ heads over time.
Split Seams & Tears
Seam failures and small tears gradually get larger as upholstery flexes daily. Brittle vinyl and leather are prone to crack and split. And pets or restless kids can cause rips and holes from nails and heels.
Irreparable Damage
Some types of damage like cigarette burns, large UV-degraded cracks in leather, heavy soiling, and significant crash damage require complete upholstery replacement. Repair costs can quickly exceed restoration values.
Upholstery Restoration Options
There are several ways to tackle renewing worn upholstery. Here are some of the most common methods auto owners use:
Professional Reupholstering
This involves completely replacing existing upholstery cover fabrics, foam, padding and attachment systems with brand new materials. It offers a like-new restoration for badly damaged interiors.
But it‘s extremely labor intensive, requiring expertise in specialized fabrication work. Reupholstering an entire vehicle can take over 100 hours and cost upwards of $3000 according to industry data. Just replacing seats alone typically runs $500-$1500.
Cost: $500-$3000
Complexity: High
DIY-Ability: Low
Seat Covers
Slip-on seat covers mask existing upholstery and provide cosmetic facelifts. The style options are endless, allowing custom looks from modern prints to classic materials like leather. But covers only disguise damage rather than fixing it. And they tend to shift around, look baggy, and make seats with side airbags less safe. Replacing them yearly can get expensive too.
Cost: $50-$500
Complexity: Low
DIY-Ability: High
Dyeing/Re-Coloring
Specialty interior dyes can renew faded fabric color and refresh vinyl and leather. When correctly color-matched and blended into surrounding areas, results can look seamless. But dyeing doesn‘t repair rips, holes or undo severe sun damage. Hiring a pro ensures proper preparation, dye selection and application.
Cost: $200-$1000
Complexity: Medium
DIY-Ability: Low
Professional Reupholstering vs. DIY Restoration Costs
| Method | Professional Shop Estimate | DIY Estimate |
|---|---|---|
| Full Reupholster | $1500-$3000 | N/A |
| Section Reupholster (seat bottoms) | $800-$1500 | N/A |
| Seat Covers | N/A | $50-$300 |
| Complete Leather or Vinyl Dye | $500-$1000 | $50-$150 |
| Upholstery Paint Restoration | N/A | $50-$150 |
*Cost estimates based on average full-sized sedan
Painting/Coating
Quality upholstery paints and coatings provide opaque coverage to completely refresh looks. Spray cans allow quick full-vehicle application versus brushes for small repairs. Properly prepped surfaces covered in two to three coats of UV-resistant formulas look factory fresh for years before needing touch ups.
Cost: $50-$500
Complexity: Medium
DIY-Ability: High
Why Upholstery Paint Offers a DIY-Friendly Restoration
For car interiors requiring more than just dyeing, upholstery and vinyl paints provide an easy, affordable restoration option even first-timers can master. Durable formulas evenly coat to renew colors and textures, hide unsightly damage, and stand up to wear.
Benefits include:
- Costs under $150 for major transformations
- No tools or experience needed for DIYers
- Opaque coverage blocks damage and stains
- Flexible formulas retain tactile feel
- Fade and UV-resistant for long wear
- Matches OEM specs for professional results
- Available in virtually unlimited colors
Modern acrylic latex and urethane paints engineered for upholstery differ drastically from craft paints. Advanced polymers allow adhesion to the most difficult automotive fabrics and emulate the texture and feel of factory upholstery when dry.
Solvent-based formulations also offer added flexibility and bond strength for smooth vinyl and leather. Compared to home interior paints, upholstery paints withstand far more extreme temperature fluctuations and UV exposure too.
Upholstery Paint Coating Types
| Formula | Description |
|---|---|
| Acrylic Latex | Waterbased acrylic paints with some vinyl mixed in. Offer colors, breathability and texture similar to original upholstery. Ideal for cloth, carpet, velour. |
| Urethane | Contains protective urethane polymers for added wear-resistance and longevity. Use on leather, vinyl, plastic, velour, and synthetic blends. |
| Vinyl Dye | Solvent-based transparent dyes that permanently color vinyl and plastic. Available in pens for small repairs. |
| Vinyl Paint | Pigmented solvent-based coatings for opaque vinyl refreshment. Flexible yet tough performance. |
Properly Prepping Upholstery for Painting
Just like painting walls or wood furniture, correctly prepping surfaces is 80% of the work with the rest in applying paint. Follow these key steps:
Step 1: Deep Clean
Shampoo, steam, spot clean, or wet vacuum upholstery to remove all dirt, body oils and waxy protectants that inhibit paint adhesion. Rinse away all residue and allow a full 24 hours to completely dry before painting.
Step 2: Repair Existing Damage
Fix tears, holes, loose edges and split seams where possible to create a smooth, continuous surface for painting. Use upholstery thread, coverstitch machines, bonding solutions or patches to mend areas with the closest match in texture and flexibility to surroundings. Replace badly damaged, weakened upholstery sections.
Step 3: Degrease & Remove Coatings
Use paint-prep solutions like Grez-Off, mineral spirits or isopropyl alcohol to vigorously wipe down vinyl, leather, plastic and painted surfaces. This deglosses, removes mold release agents from factory and preps the surface for optimal adhesion. Lightly scuff shiny vinyl and plastic components to uniformly dull and rough up.
Step 4: Apply Adhesion Promoter
For the hardest to paint surfaces like vinyl and leather, use an adhesion promoter so paint layers anchor tightly without peeling or flaking off over time. Consult manufacturer specs for proper drying times before applying coats.
Step 5. Final Wipe Down
Give surfaces one final wipe with a tack cloth to remove any remaining dust or lint particles before painting.
DIY Painting Procedure
Follow these top professional tips when applying upholstery paint:
Select a Dust-Free Workspace
Choose an indoor location without direct sunlight or airflow. This prevents dust nibs and debris from embedding in the paint. Finish restoration garages work perfectly to avoid overspray lingering indoors. Consider constructing a small temporary paint booth using plastic sheeting if working in a home garage.
Use Quality Supplies
Invest in premium nylon/polyester brushes, high-density foam rollers, and microfiber applicators to apply paint smoothly and evenly. Poor quality tools cause obvious brush marks and streaking. Pick a reputable brand like SEM Products suited for auto use. Prepare small paint trays or roller pans and strain paint if needed to prevent blotches from dried bits.
Maintain Proper Spray Distance
For spray can or paint gun application, keep the nozzle 6 to 8 inches from the surface and spray using straight uniform passes at moderate speed. Overlap each pass 50 percent to prevent missing spots and create even coverage. Mist coating initially is better than laying it on too heavy.
Allow Proper Dry Times
Apply thin first coats to avoid pooling or runs. Follow manufacturer dry times between recoat layers, usually 1 to 2 hours. Cool temperatures or high humidity extends dry times. Insufficient drying causes paint wrinkling if another layer goes on too soon.
Finish with Multiple Coats
2-3 coats provides full vibrant color and a protective layer that stands up to wear. Sand very lightly between coats as needed to knock down dust particles. Clean away overspray fallout on surrounding areas after final coat.
Consider Grain Filler
For porous or textured vinyl and leather, use a vinyl dye or primer coat first to avoid uneven absorption. Grain filler levels ripples in leather. Seal prior to painting with an isolation barrier like PearlEx Pigment Powder for best results.
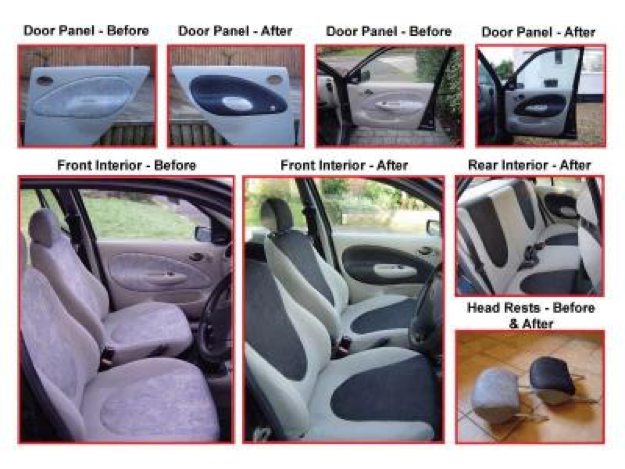
[Example of properly prepped and painted leather upholstery texture]Top Product Recommendations
Using quality paint and supplies tailored for upholstery makes all the difference in results and longevity. Consider the following best-in-class restoration products:
Upholstery Paint
- SEM Color Coatref1
- Createx Auto Air Upholstery Paintsref2
- LLumar & Avery Dennison Vinyl Wrap Filmref3
Adhesion Promoters
- SEM Solve and Goo Gone Grez-Offref4
- 3M Adhesion Promoterref5
Brushes & Rollers
- Wooster 2.5” Angle Sash Brushref6
- Beacon Promex Short Nap roller coversref7
Degreasers & Cleaners
- Chemical Guys Leather Quick Cleanerref8
- Meguiar’s Gold Class Carpet & Upholstery Cleanerref9
Vinyl & Leather Conditioners
- Leather Honey Leather Conditionerref10
- TriNova Leather & Vinyl Restorerref11
Restoring Vinyl vs. Leather
Vinyl and leather upholstery repair differently and have unique prep considerations:
Vinyl
- Less porous but more prone to cracking from age or UV damage
- Degloss and rough up shiny surfaces for paint adhesion
- Use extra adhesion promoter/primer for plastics
- Avoid petroleum distillates that can dry out vinyl
Leather
- Natural hide structure varies so grain filling helps flatten
- Avoid oil-based conditioners prior to painting
- Dye and pre-seal grain first before painting
- Acrylic leather paint flexibility prevents cracking
Maintaining Refreshed Upholstery
- Allow paint to cure 1-2 weeks before heavy flexing or use
- Use MPs and seat covers in high-contact body areas
- Frequently vacuum and professionally clean painted carpets
- For vinyl and leather, gently wipe spills and only use recommended cleaners
- Condition vinyl and leather every 3-4 months
- Touch up paint chips and worn areas as soon as they appear
Properly cared for, upholstery paint and restoration coatings hold up for 5 years or longer before needing renewal. Implementing solid maintenance practices preserves your efforts.
Conclusion
Restoring worn, unsightly car upholstery back to like-new condition no longer requires expensive reupholstering or replacement. DIY-friendly vinyl and fabric paint solutions provide professional-grade transformations in a weekend for under $150.
With proper planning and preparation, these durable coatings stand the test of time and use. Just remember to thoroughly clean, degrease, smoothen and pre-treat all surfaces first, then use quality applicators and multiple coats for optimal coverage. Maintain protected upholstery well and your efforts create a fresh interior guaranteed to impress for years before needing a touch up.
ref1. SEM Products Color Coat, semproducts.com/product/color-coat
ref2. Createx Auto Air Colors, createxcolors.com/createx-auto-air-colors
ref3. LLumar & Avery Dennison Vinyl Wrap Film, llumar.com/automotive-film/specialty-films/upholstery-film
ref4. SEM Solve and Goo Gone Grez-Off, semproducts.com/product/solve
ref5. 3M Adhesion Promoter, 3m.com/3M/en_US/p/d/b00052548/
ref6. Wooster 2.5” Angle Sash Brush, woosterbrush.com/brush-types/angled-sash/
ref7. Beacon Promex Short Nap roller covers, homedepot.com/p/BEACON-PRO-3-8-in-Nap-Promex-Paint-Roller-Cover-5-Pack-73005-5PK/205743872
ref8. Chemical Guys Leather Quick Cleaner, chemicalguys.com/Leather-Quick-Cleaner-16-oz
ref9. Meguiar’s Gold Class Carpet & Upholstery Cleaner, meguiars.com/auto-carpet-upholstery-cleaner
ref10. Leather Honey Leather Conditioner, leatherhoney.com
ref11. TriNova Leather & Vinyl Restorer, trinova.com/collections/automotive-uv-surface-protectants-finishes